Most companies, if not all, have their own set of holidays on top of national ones. So, distributing them is a pretty common task for an Office 365 / Exchange admin. There are different approaches out there with their own pros and cons. I’ve come up with two methods that combined give me a great result.
In this post let’s focus on the 2nd method – a bulk one.
I came up with this method after doing the migration from IBM Domino to Office 365. It looks complicated but after doing it several times you’ll get comfortable and it won’t be taking much time anymore.
To see more about the 1st method (manual), please follow this link – Add corporate or custom holidays to user calendars – 1st method – manual
PREREQUISITES:
1) Download and install (please use default settings) Azure Storage Explorer
2) Prepare a .csv file with all accounts using the following template – https://docs.microsoft.com/en-us/office365/securitycompliance/use-network-upload-to-import-pst-files#step-4-create-the-pst-import-mapping-file
In our case that .csv file should look like this:

To get a list of all emails use this PowerShell script:
Get-Mailbox -ResultSize Unlimited | Select-Object DisplayName,PrimarySMTPAddress | Export-Csv -Path "C:\Temp\emails.csv"
This PowerShell script will output all email addresses including shared mailboxes and resources. If you don’t want to add corporate holidays to those, either adjust the script or filter the output of the current one.
3) Prepare a .hol file that contains all Contoso Holidays for the year required – this post Add corporate or custom holidays to user calendars – 1st method – manual shows how to do that.
STEPS:
1) Create a new temp user in Office 365 Admin. Any name would work. Assign a license so that this temp user has got a mailbox. If assigning a license is not an option, you can create a shared mailbox instead and work with it.
I would highly recommend using a temp user because we need a .pst file with a fresh calendar that has nothing but Contoso Holidays that need to be distributed. Using your personal calendar might pull some other events that must not be added to other users’ calendars.
2) Configure that new temp user’s profile in the Outlook.
3) Add Contoso Holidays to temp user’s calendar by opening a .hol file. Please see how to prepare such a file in this post – Add corporate or custom holidays to user calendars – 1st method – manual
4) Export temp user’s calendar into calendar.pst file using Outlook built-in functionality.
5) Go to Microsoft 365 admin center – Admin centers – Security & Compliance – Data governance – Import (https://protection.office.com/?rfr=AdminCenter#/import), then:
- Click on New import job
- Name your job (e.g. contoso-holidays-2019) – Next
- Select Upload your data – Next
- Press on Show network upload SAS URL in the step 2
- No need to close that dialog window
This link is valid for 1 month. Please save it somewhere as it will be used later.
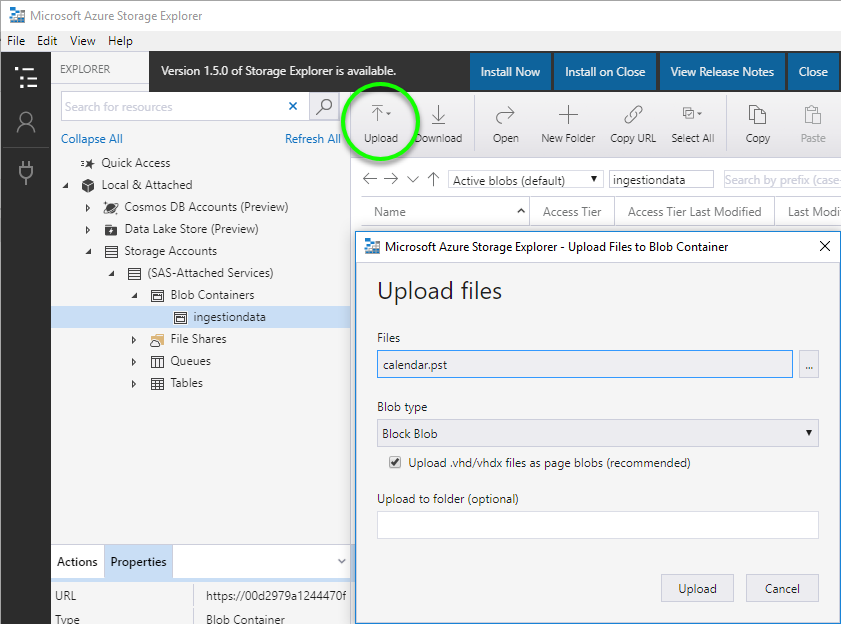
6) Upload calendar.pst to Azure Cloud Storage using Azure Storage Explorer:
- Run Azure Storage Explorer
- Click on Add Account
- Select Use a shared access signature URI
- Paste the link without quotes from step 5 into URI field
- Click on Next, then Connect
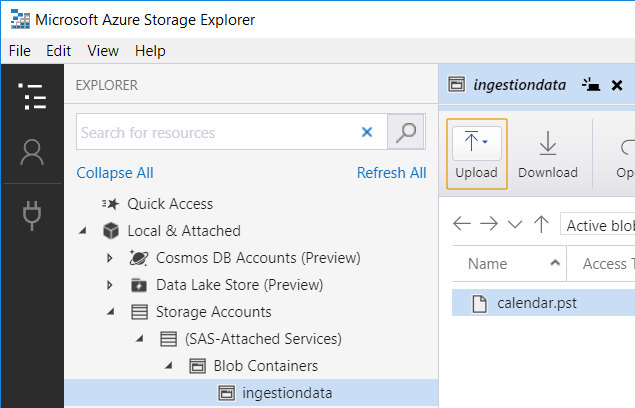
- Go to Local & Attached – Storage Accounts – (SAS-Attached Services) – Blob Containers – ingestiondata
- Click on Upload – select your calendar.pst file – then click on Upload with the rest settings by default
- Make sure your calendar.pst has been successfully uploaded
7) Go back to Import page in step 5 where we left and check both I’m done uploading my files and I have access to mapping file, then Next.
8) Select a mapping file (Prerequisites – step 2) and then Validate it.
9) Once validated Save the job. Wait till it’s processed by Microsoft Exchange. Then it will be ready for import.
10) When ready, find and open your job. Click on Import to Office 365.
11) Select No, I want to import everything, then Next.
12) Click on Import data.
13) Wait till the Import is done and check the results. If everything is done properly, the number of imported items must be the same as the number of Contoso Holidays for that year for each mailbox. Notify everyone if needed.
Please note, it takes about 1 day for Microsoft to import data. However, the process is highly paralleled so it shouldn’t be an issue to add those holidays to hundreds or even thousands of mailboxes.
14) Once everything is done, delete the temp user from Office 365 and remove its profile from Outlook.
15) Run the following PowerShell script to disable Retention Hold:
Get-Mailbox -ResultSize unlimited | Set-Mailbox -RetentionHoldEnabled $false
Important!!! Because this whole method uses the same mechanism that’s used for migrating/importing data, it puts all processed mailboxes into Retention Hold state. That means none of your retention policies will work unless you disable Retention Hold.
Pros:
- No users’ action is required
- Can be done at any time during the week
- Hundreds or thousands of mailboxes can be processed at once
Cons:
- Takes about 1 day for Microsoft to import data
- Some preparation work is needed
How’s this work, going forward for new users being added to org?
Sorry for the late reply. For new users that have missed an automated yearly update I recommend sending *.hol files as part of the “Welcome” email.
More on this here – https://365basics.com/add-corporate-or-custom-holidays-to-user-calendars-1st-method-manual/
I would agree this manual method of catching up is good for small to medium size companies.
May I know the last step(15) disabling the retention hold, what does it do?
It look dangerous
Hi Matthew,
Disabling Retention Hold is not dangerous, instead forgetting about it and keeping it on is more problematic.
A simple example. You have a policy that cleans up “Deleted Items” folder after 30 days. You go through that process described in this article, the system turns on Retention Hold for every processed mailbox. If you forget to disable Retention Hold, users’ “Deleted Items” folders will not be cleaned up after 30 days. The system will protect users’ mailboxes from any retention policies / tags.
Dear Pavel,
But our current policy will delete items from deleted folders after 30 days, how will this command affect any behavior?
Matthew,
Retention Hold will put all current policies on hold meaning items will not be deleted after 30 days. That’s why it is important to disable Retention Hold from every processed by this method mailbox. Disabling it will put all things back to normal.
To be honest, that’s how I noticed it – after adding holidays to user calendars, two months later or so a few users reported their Deleted Items were not longer cleaned after 30 days.
Note, companies do have legitimate reasons for implementing RetentionHold, e.g. we may have a policy that deletes all Inbox messages after 90 days, but that mailbox is put on RetentionHold if someone goes on leave (maternity, medical, whatever) so that emails are not deleted while they are gone. Agree that that line of code is risky if you don’t know what you’re doing.
Hi Darren,
You are correct – there might be reasons to have Retention Hold already on for some mailboxes.
I guess it might be a good idea to use a concept similar to this ( https://365basics.com/powershell-office-365-enable-or-disable-service-plan-options-within-each-license-package-while-respecting-current-configuration-for-each-user/ ) to know which mailboxes already have Retention Hold turned on, so when you turn it off, you honor their original state.
Thanks for visiting my site.
I tried this, although with just appointments created in a calendar and not with a .hol file (I need to have appointments for specific times) and everytime I try to upload it, it will create a new calendar in the mailbox if I define the TargetRootFolder as “/Calendar” and it will do nothing if I define the TargetRootFolder as “/”
Thoughts??
Hi Alan,
Yes, that issue sounds familiar.
It is true if you define TargetRootFolder as /Calendar” it will create a new “calendar entity. That is why “/” is a correct value.
Now how to make it work – that test user I mention in my post must have those events in “his” primary calendar and not within any other category.
Thanks!
Can the import job be deleted after the calendar is updated?
Hi Dinesh,
Are you referring to this?
Remove-MailboxImportRequest – https://docs.microsoft.com/en-us/powershell/module/exchange/remove-mailboximportrequest?view=exchange-ps
I was talking about the Security & Compliance – Data governance – Import job. Also , is there a way to set the calendar status as busy rather than free for the holidays?
Dinesh,
1) Doesn’t cmdlet I linked above do that?
2) I think it’s whichever status you set in your source mailbox/calendar, though I cannot check it currently. It is true once you select a “full day event”, it becomes “Free” automatically but it can be adjusted to “Busy”.
Hi, once the import has completed, do the holidays show in the calendar straight away or after the import is completed, can it still take up to 24 hours for the items to appear in the calendar.
Hey Ross,
Once the import is done (which easily can take 24 hours or more), then it should appear in user calendars. Reopening Outlook might help with calendar refresh on users’ side.
hi Pavel!
thank you for putting this together! have you figured out if any type of custom “mail tip” can be configured? not necessarily setting event as busy (i’d imagined employees would lose their minds over this) but just showing a little tip/reminder of the event.
Hey Pavel!
Great solution – thanks for taking the time to post this.
What would a roll-back solution entail? Dates changes, new dates are added and some removed. Can you use Security and compliance to say, remove all “imported” events and update the PST and redeploy? would this be an option?
Best,
Hi Frank,
There is no roll-back solution per se. You might have to use something like Remove-CalendarEvents cmdlet or use Graph API to remove those calendar events.
When I used that approach, I would test it on a single (test?) user or myself, then deploy it to everyone.
Hi Pavel – thanks for this article, i’m just working my way through it and i’m having some issues with the SAS URL and the Azure storage explorer, it doesn’t like the URL. From what i’ve ready i now need to use AZCopy? Would the rest of the process remain the same with this tool? Thanks.
Hi Luke,
I did successfully use AZCopy in the past for a similar task where I needed to uploaded mailboxes in bulk (600 GB). Those 2 tools can indeed perform the same tasks. The rest of the process should be the same as both AZCopy and Azure Storage Explorer are used to upload data to Azure Cloud Storage.
Hello Paul, I would like to add a calendar to everyone in my organization, but as a separate calendar.
Hi Jose,
What do you mean by a separate calendar?
If it’s a separate mailbox/calendar, then you just create one, then add all users as members to it with limited access. Or you share its free/busy with everyone.
If you were referring to a “calendar location”, then you can adjust its name per this post:
https://365basics.com/add-corporate-or-custom-holidays-to-user-calendars-1st-method-manual/
Hello Paul, thanks for your reply. what I mean is to deploy a organization- wide calendar, and without end-user innervation, not to the user’s calendar.
hi Paul,
Thanks for this resouce, I used it last year and it worked perfectly.
This year – I’m running into a bit of a problem. Microsoft has retired the Office 365 Security and Compliance Center, and I’m having a heck of a time finding the data import referenced in step 5. Do you have any ideas where Microsoft has stashed it?
Paul –
disregard my comment.
Google found it for me. 🙂
Data lifecycle management > Microsoft 365 > Microsoft 365 > Import.
Hey Tom,
Yes, Microsoft likes to move things around. I’ll keep your comments to help other people.
Hello Paul
Where do we need to use emails.csv? I don’t find where to use it.
Unless something changed, then that file is used in Step 8.
Paul,
My question is how do I deploy to a subset of users? Our company is global. So I wouldn’t want India Holidays on US members calendars or vice versa.
Hi David,
You would have to have separate CSV files for each region. Those typically can be created using a PowerShell script that scopes users by their region or any other distinctive property.
Hey Paul,
Thanks for this – I have used it a few years in a row. This year, when I tested on just my calendar, I realized that the .pst calendar in azure had all the US holidays and so it duplicated them and imported 76 items instead of just the 25 holidays. So I adjusted the .pst and used azcopy tool to re-upload the new .pst with just the 25 holidays in it. I chose to “enable replace” and named it the same name. Ran a test on just my account and it worked fine. So I then rolled out to production and it somehow processed 176 items! I know there is no “roll-back” per se – but is there any way I can delete all duplicate holidays? Hindsight – and a tip for those using this – if you have to adjust the .pst, just rename it and start over. Do not “replace” the existing .pst.
Hey Chris,
A costly mistake for sure 🙂 – I’ve always uploaded new files. I think you would have to use Graph API and/or PowerShell to go through all mailboxes, find those events, then delete them.
Where is the “import” under “data governance” in the new portal? Can’t find it anywhere.