Imagine an Email Merge process that doesn’t require any mapping per se. A process that is as easy as composing an email. Look no further!
The pros of this workflow are:
- uses a single SharePoint list that can be easily reused for another Email Merge need;
- use the same SharePoint list to send email merges with a few or lot of fields;
- preserves all custom html formatting of an email;
- doesn’t use paid connectors and premium Power Automate license;
- no need for data mapping – you just compose an email using special tags;
- can have as many columns and as many tags as you would like.
Please note, as this workflow is quite complicated logically, I would encourage you to make my example fully work on your side first, then apply its concept to your business needs second.
PREREQUISITES:
1) Let’s create a SharePoint list. Rename its Title column to Email – this column will store email addresses and will be used to send emails to them after the merge.
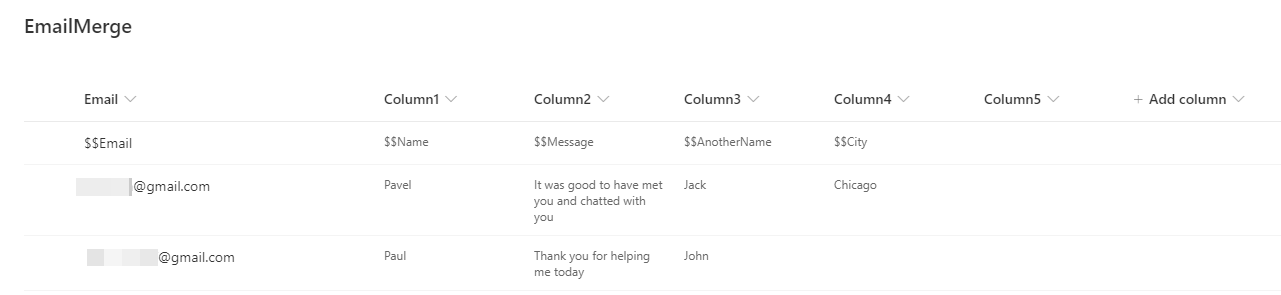
The rest of the columns are Single line of text type columns and their names are Column1, Column2, Column3, and so on. In my example I only have them up to Column5, but you can easily do Column500.
One of the entries (doesn’t necessarily have to be the 1st one in the list) will store our tag words, in my example they start with “$$”: $$Name, $$Message, etc.
The rest of the entries should have data that matches the tag words above. $$Name tag is in the same column as Pavel and Paul names.
I left Column5 empty on purpose and Column4 with some partial data to prove the system will only work with data that needs to be used.
2) Create a mailbox that will trigger a workflow once a message is received from you or any other person that launches the Email Merge. Users will send messages to it so using your mailbox is not a great idea.
FLOW:

Please note, some of these steps are redundant (e.g. Compose actions) but they help better understand how everything works.
Let’s take a close look at each step:
1) When a new email arrives (V3) action. Only an email which subject contains “email merge” words will trigger the workflow.
![]()
2) Initialize variable action – varEmailBody variable.
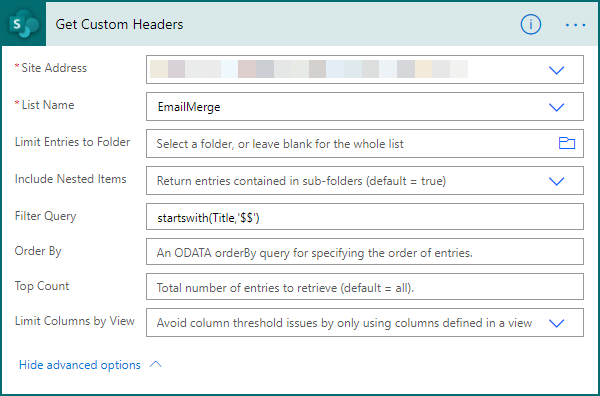
3) Get items action. Get the entries that contain the tag words.
4) Compose action. Get the first found entry from Step 3.

first(body('Get_Custom_Headers')?['value'])
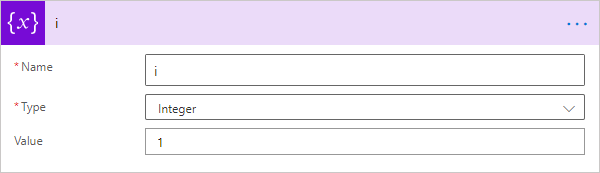
5) Initialize variable action – i variable.
6) Get items action. Get all entries except for the one from Step 3.

ID ne 'outputs('Get_Custom_Headers_line')?['ID']'
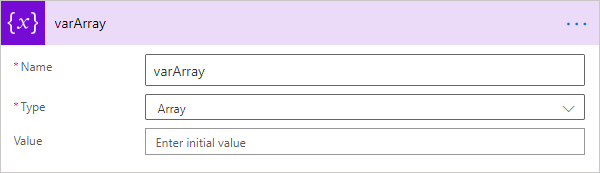
7) Initialize variable action – varArray variable.
8) Do until action.
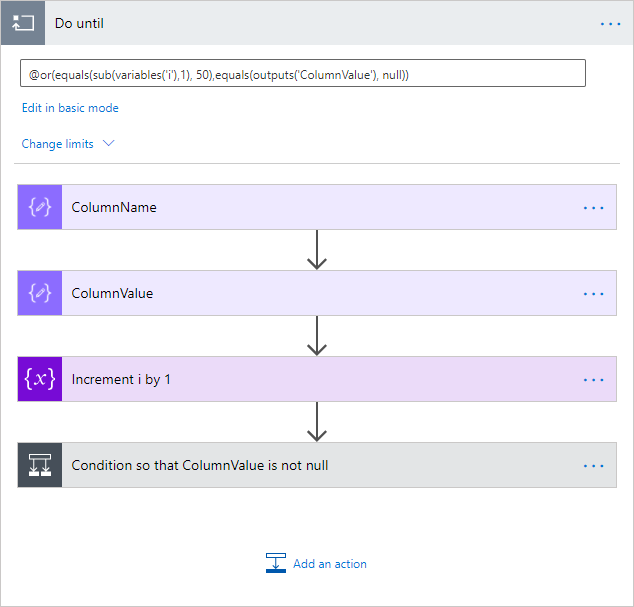
Edit in advanced formula:
@or(equals(sub(variables('i'),1), 50),equals(outputs('ColumnValue'), null))
50 is the maximum number of iterations to go through. 50 is way more than 5 columns that my example has.
9) Compose action. SharePoint column name.

concat('Column',variables('i'))
10) Compose action. $$ value of the column from Step 9.

outputs('Get_Custom_Headers_line')?[outputs('ColumnName')]
11) Increment variable action.

12) Condition action – checks that ColumnValue is not null.
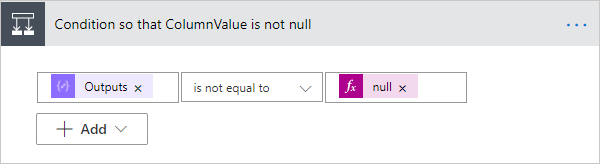
outputs('ColumnValue')
13) Append to array variable action.

{
  "Column": "outputs('ColumnName')",
  "Value": "outputs('ColumnValue')"
}
14) Apply to each action.

outputs('Get_all_entries_except_for_Headers_Line')?['body']?['value']
15) Set variable action.
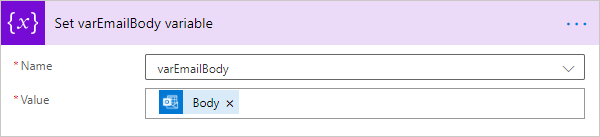
triggerOutputs()?['body']?['body']
16) Apply to each action.
variables('varArray')
17) Compose action.

items('Apply_to_each_Column')?['Column']
18) Compose action.

outputs('Get_Custom_Headers_line')?[Outputs('SharePointColumnName')]
19) Compose action.

items('Apply_to_each_entry_except_header_one')?[Outputs('SharePointColumnName')]
20) Compose action.

variables('varEmailBody')
21) Condition action.
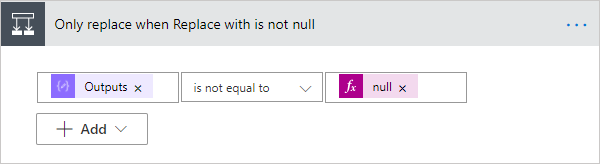
outputs('Replace_with')
22) Set variable action.
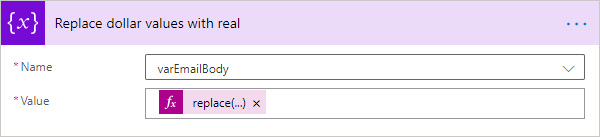
replace(outputs('Current_varEmailBody_value'),outputs('What_to_replace'),outputs('Replace_with'))
23) Send an email (V2) action.
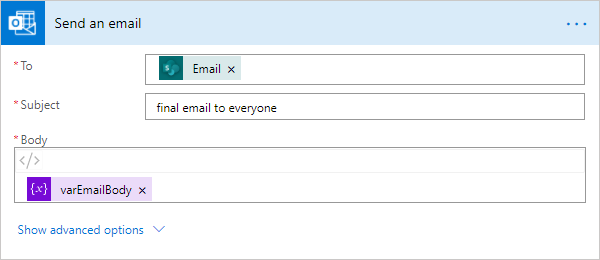
To:
items('Apply_to_each_entry_except_header_one')?['Title']
Body:
variables('varEmailBody')
Don’t forget to switch to HTML view when entering the Body content.
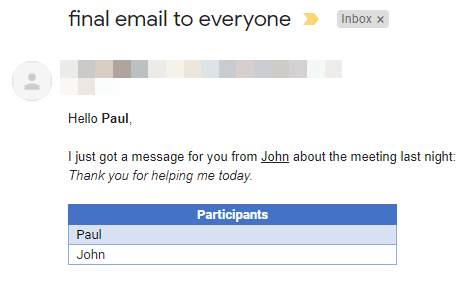
RESULT
All you do is you compose a message, include tag words which will be replaced with values from the SharePoint list, use whichever formatting you would like to have, then send it to your special mailbox.

See results of the Email Merge in each mailbox: