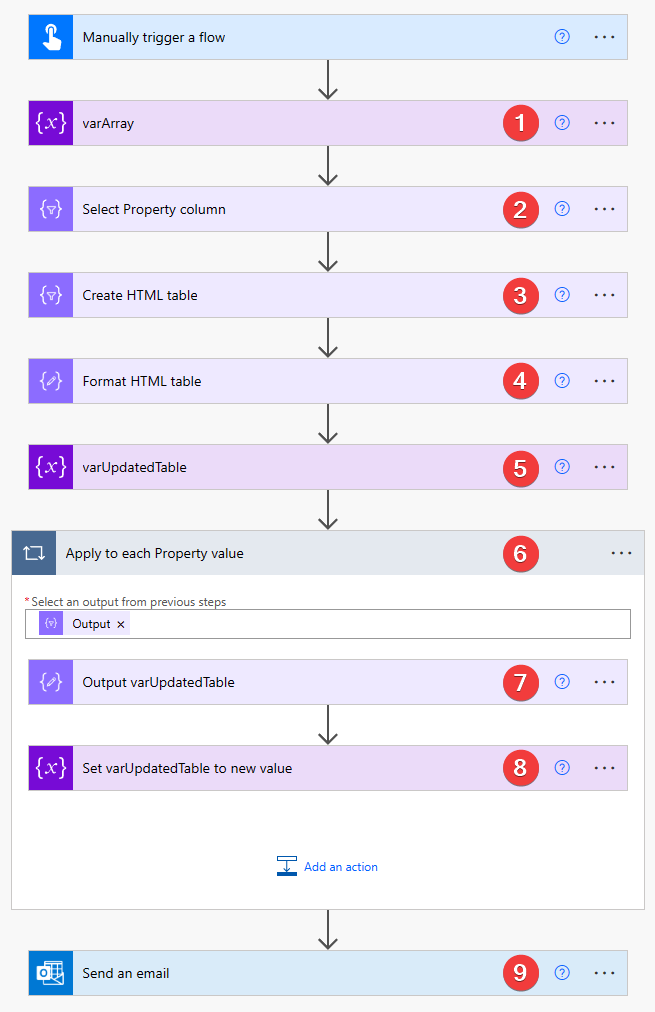
Power Automate has an amazing Create HTML table built-in action. Whether you format that table or not after is totally up to you; however, the output table always has standard headers. The flow below shows how to automatically format your table into one with row and column headers at the same time.
1) Initialize variable action – varArray variable (Array type). Value:
[
  {
    "Property": "First Name",
    "Current": "Lisa",
    "Requested": "Elisabeth"
  },
  {
    "Property": "Last Name",
    "Current": "Smith",
    "Requested": "Brown"
  }
]
2) Select action. From:
variables('varArray')
Select:
item()?['Property']
3) Create HTML table action. From:
variables('varArray')
4) Compose action. Inputs:
<style>
    table {
        border: 1px solid #1C6EA4;
        background-color: #EEEEEE;
        width: 70%;
        text-align: left;
        border-collapse: collapse;
    }
    table th {
        border: 1px solid #AAAAAA;
        padding: 3px 2px;
    }
    table tbody td {
        font-size: 13px;
    }
    table thead {
        border-bottom: 1px solid #444444;
    }
    table th {
        font-size: 15px;
        font-weight: bold;
        color: #FFFFFF;
        background: #1C6EA4;
        border-left: 1px solid #D0E4F5;
    }
</style>
body('Create_HTML_table')
Please note, body(‘Create_HTML_table’) should be inserted through Add dynamic content – Expression.
5) Initialize variable action – varUpdatedTable variable (String type). Value:
outputs('Format_HTML_table')
6) Apply to each action.
body('Select_Property_column')
7) Compose action. Inputs:
variables('varUpdatedTable')
8) Set variable action. Value:
replace(
    outputs('Output_varUpdatedTable'),
    concat('<td>',item(),'</td>'),
    concat('<th>',item(),'</th>')
)
9) Send an email action. Body (switch to HTML):
variables('varUpdatedTable')
If you don’t like the Property header name in that table, then you need to adjust Step 3 (Create HTML table) and use a custom mapping with a blank header instead.


